Kubernetes
Kubernetes is the de facto standard for running containerized applications. Kubernetes (K8s) is an open-source system for automating deployment, scaling, and managing containerized applications.
![]()
Aptly named, Kubernetes is a pilot (or) helmsman that helps you to sail the container world. Kubernetes is a portable and extensible system built by the community for the community. Kubernetes is simple to use. Kubernetes makes it easy to deploy and run containerized applications. Kubernetes provides a lot of different configuration that makes your deployment easier.
As Kelsey Hightower, correctly quotes: Kubernetes does the things that the very best system administrator would do automation, failover, centralized logging, monitoring. It takes what we’ve learned in the DevOps community and makes it default, out of the box.
In order to work with Kubernetes, it is very important to understand (or just curious)
- How Kubernetes works?
- How Kubernetes is architected?
- What are the various components in Kubernetes?
Let us start hacking on Kubernetes.
How does Kubernetes work?
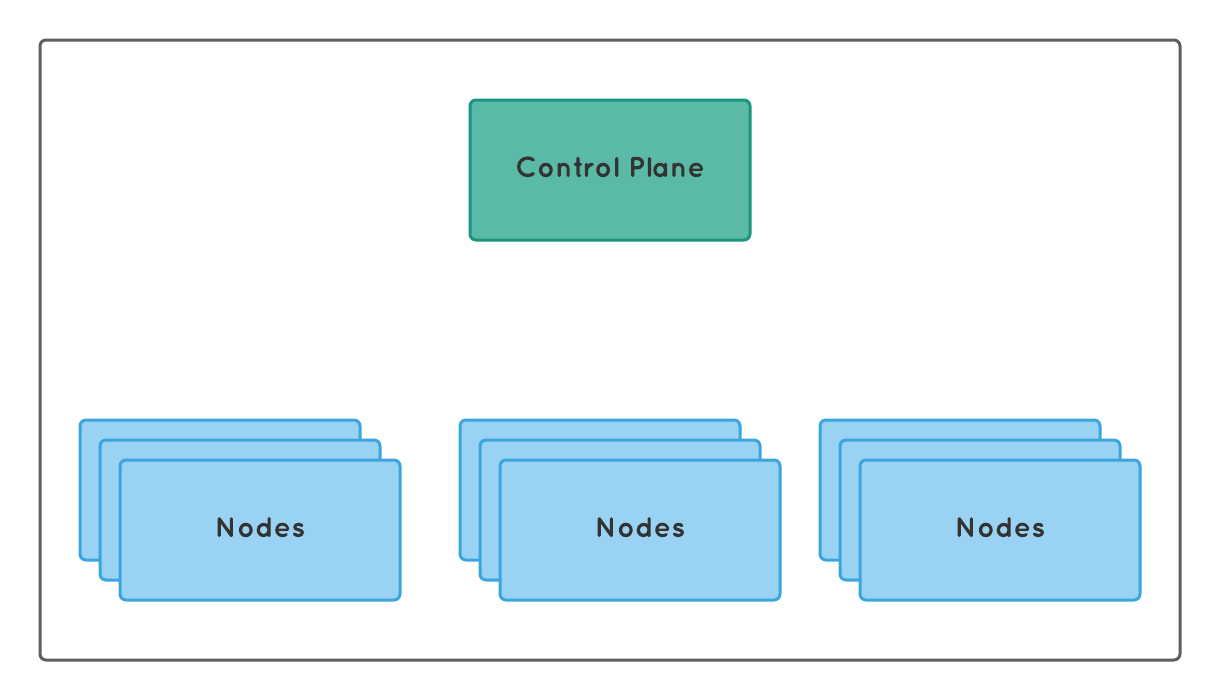
The Kubernetes runs in cluster mode. The Kubernetes cluster consists of a control plane and a few nodes. The Kubernetes cluster is highly available, it is possible to run the control plane on multiple nodes.
Control plane
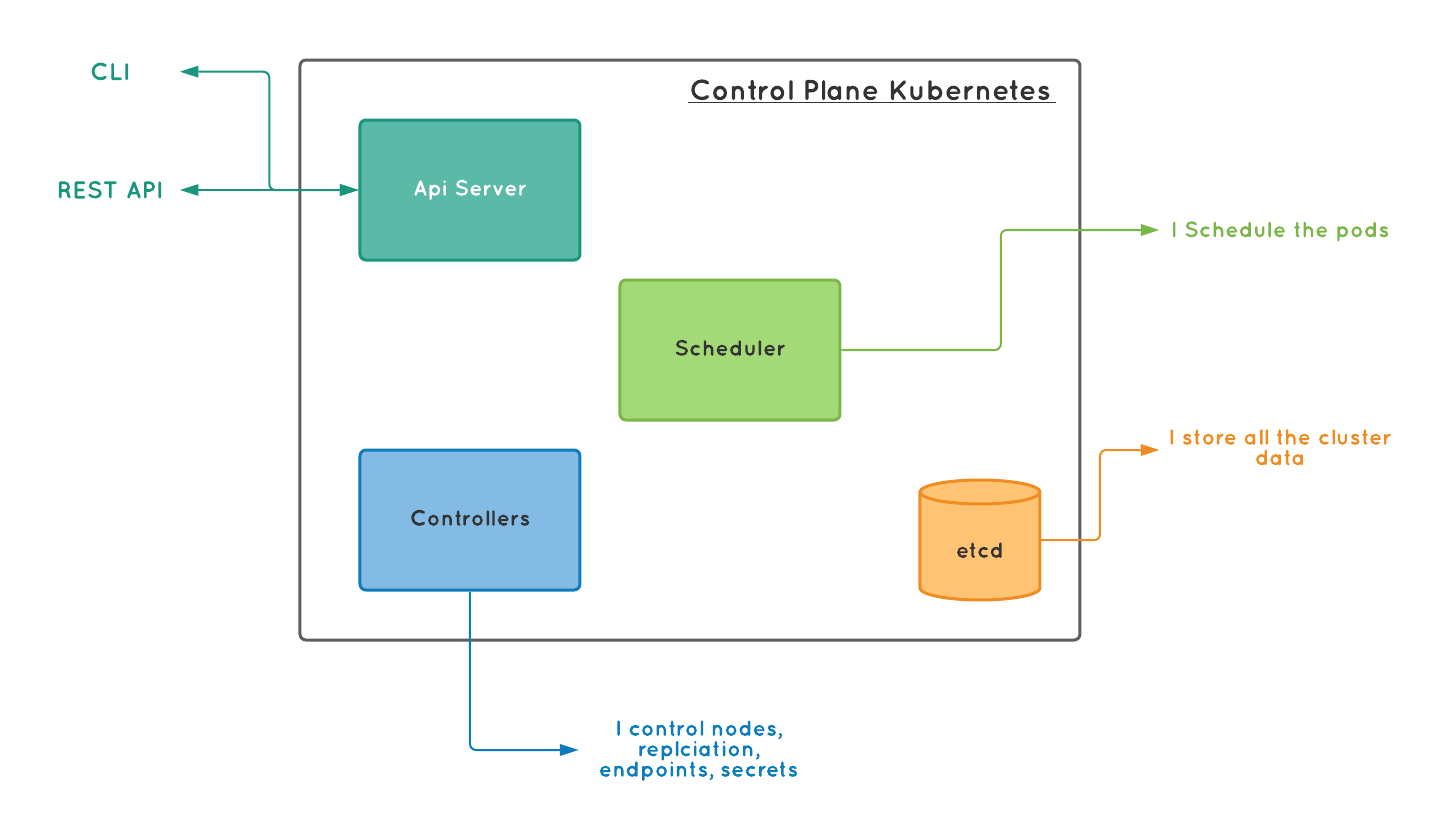
The control plane consists of an API server, Scheduler, Controllers, and etcd. It is responsible for all the actions inside Kubernetes. It is the decision maker and decides when to schedule a container, respond to cluster events. It is responsible for defining, deploying, and managing the containers' lifecycle. The goal of the control plane is to ensure that containers are running inside the cluster to match the provided information. For these reasons, the control plane is considered to be the brain of Kubernetes.
In the Kubernetes world, the lowest deployment unit is a "Pod". They are nothing but a group of containers. We will see them more detailed below.
API Server
we set or get information from the Kubernetes using the API server. The API server is the front-end of the control plane (or even the entire Kubernetes). The Kubernetes API server first validates the request (for example the provided yaml file) and then puts it in a queue to schedule the workload.
Scheduler
The Scheduler is responsible for scheduling the pods. Consider the scheduler as a queue waiting for instructions. Once it receives the instruction to deploy / undeploy a container, it schedules the respective action.
Controllers
The Controllers are responsible for running the resource controllers. The resource controller keeps track of what is currently running, if it is out of sync from what has been provided, it automatically starts the process to bring back the desired condition as given in the spec to the cluster. The controllers are splitted into separate process depending on what it handles. There are node, replication, endpoints, secrets controller and they handle nodes, replication of pods, creates endpoints, and service accounts for secrets management.
Additionally the Kubernetes control plane, also has the cloud controller manager to handle cloud specific things. For example, cloud providers like Azure, can implement a cloud controller manager that handles nodes, replications, endpoints, secrets, etc., with their own set of API on top of Kubernetes.
etcd
The etcd is the storage for Kubernetes cluster. It is a key-value storage that holds all the information that are required for Kubernetes to run and all the current deployment information. Consider it as a highly available, distributed database for the Kubernetes. If the current node that acts as a control plan is down for any reason, then the next elected control plane will use this stored information from etcd to make sure the desired condition as given in the spec is restored. It stores all the cluster data and their current state.
Note: All the above components are designed to run on a highly available environment.
Node
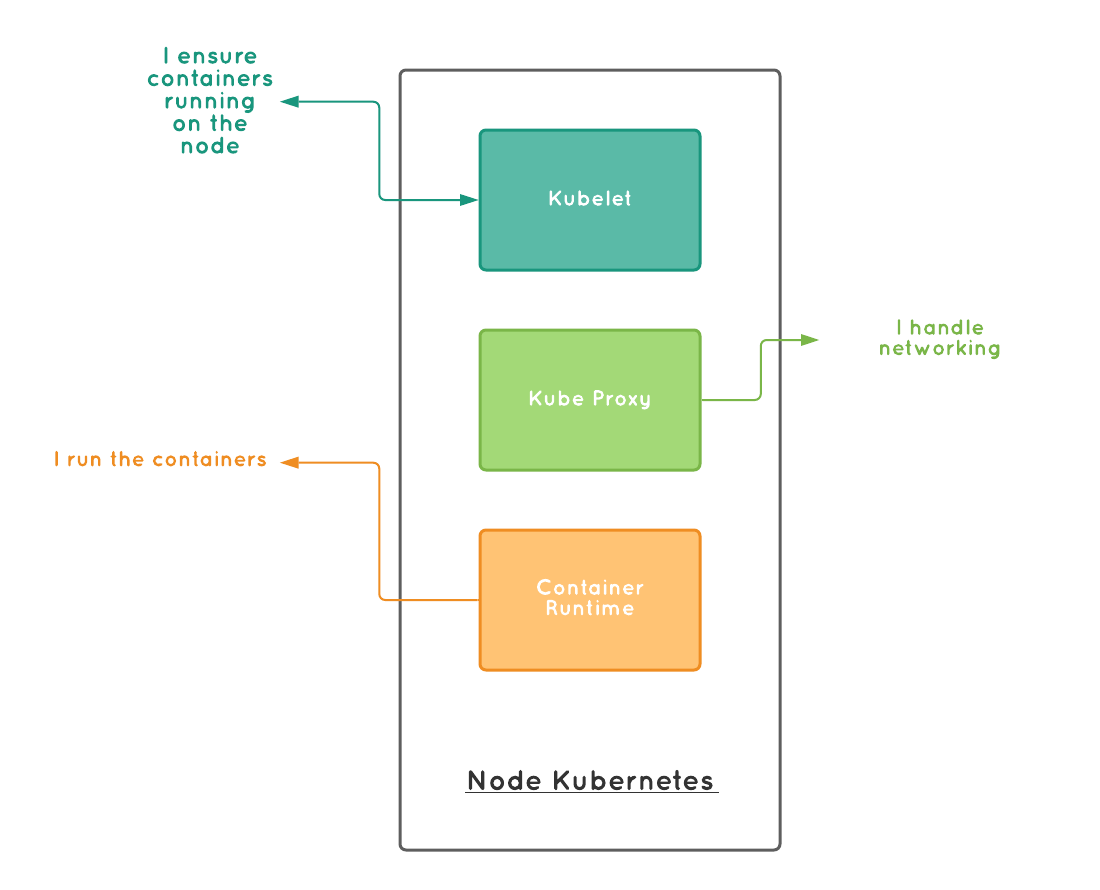
The control plane controls the nodes. The nodes are working horse in Kubernetes cluster. They consist of Kubelet, kube-proxy, and container runtime.
kubelets
The kubelets are available in each node. They ensure the containers are running in a pod as per the given pod specification. We specify what containers should run inside the pod in the podspec (pod specification) file. The kubelet ensures the containers running in the pod are as described in the podspec and in a healthy and reachable state.
kube-proxy
The kubernetes replicates pods when we scale up. That is it runs multiple instances of the pod. Each of these instance will have a separate IP (refer service section for more information). Kubernetes uses service to abstract these replicas. The kube-proxy using this service abstraction handles the networking inside each node. The Kube proxy is responsible for various services running inside the kubernetes are connected via TCP, UDP, and SCTP connections. They are network proxies.
Container runtime
The container runtime is responsible for running containers. It can be either Docker, containerd.
Working

We provide the yaml file to the Kubernetes cluster through kubectl apply command.
The apply command calls the API server, which then sends the information to the controller and simultaneously stores the information to the etcd. The etcd then replicate this information across multiple nodes to survive any node failure. The controller frequently checks whether the given state (of the Kubernetes cluster) matches the desired state (mentioned in the podspec files). The checks are called as the reconciliation loop that runs inside the Kubernetes. The job of this loop is to validate whether the state requested is maintained correctly. If the expected state and actual states mismatch this loop will do the necessary actions to convert the actual state into the expected state. That is the controller initiates the pod deployment, by sending the instruction to the scheduler.
The scheduler has a queue inside. Once the message is received in the queue. The scheduler invokes the kubelet to do the intended action such as downloading and deploying the containers in the podspec, and eventually running the pod.
This is a 10000 feet bird view of how Kubernetes does the deployment. There are various components inside the Kubernetes. Let us take a look at what are they and how are they useful.
Components of Kubernetes
Pods
In general terms, pods are nothing but a group of dolphins or whales. Aptly named in the Kubernetes world, pods are a group of containers living together. A pod may have one or more containers in it. Pod is the smallest unit of deployment in Kubernetes. When designing your podspec, group the containers that cannot live outside the scope of another container to form a pod.
You define the pod inside the podspec file. This is the example of a podspec file:
apiVersion: v1
kind: Pod
metadata:
  name: myapp-pod
  labels:
    app: myapp
spec:
  containers:
    - name: myapp-container
      image: busybox
      command: ['sh', '-c', 'echo Hello Kubernetes! && sleep 3600']
- apiVersion denotes the Kubernetes cluster which version of API to use when parsing and executing this file.
- kind defines what is the kind of Kubernetes object, this file will refer to.
- metadata includes all the necessary metadata to identify the Pod.
- spec includes the container information. The container information includes the name, image, command to run and all the other container information to run them. Note the containers here is plural, that is we can define one or more containers inside the spec.
Deployments
The pods are unit of deployment. But the desired state of your application will be defined as a deployment. The deployment consist of how to run your pods. The deployment controllers are responsible for making the desired state into actual state of Kubernetes. The deployment is considered to be the recorded information about pods. Kubernetes uses this deployment information to manage and monitor the applications that are deployed in them.
The below file is the sample deployment file:
apiVersion: apps/v1
kind: Deployment
metadata:
  name: nginx-deployment
  labels:
    app: nginx
spec:
  replicas: 3
  selector:
    matchLabels:
      app: nginx
  template:
    metadata:
      labels:
        app: nginx
    spec:
      containers:
        - name: nginx
          image: nginx:1.7.9
          ports:
            - containerPort: 80
Similar to the podspec file above, we start with the apiVersion. Then the kind here is Deployment. The metadata describes the metadata of the deployment. They include the name, labels, etc., This is useful to search and locate the deployments.
Finally spec contains all pod related information, we specify how many replicas to run (3 in this case), identifers and mapping to existing labels, finally about the containers. Here we tell the Kubernetes to create a deployment of nginx using the nginx:1.7.9 image and start 3 replicas.
Replicasets
While deployment tells the Kubernetes what containers are needed for your application and how many replicas to run. The ReplicaSet is the ones that ensure those replicas are up and running.ReplicaSet is responsible for managing and monitoring the replicas. Often we will define the replicas inside the deployments rather than specifying replicaSet distinctly.
StatefulSet
Being stateless is desired. But often times we will need to have persistent storage or permanent network identifiers or ordered deployment, scaling, and update. StatefulSet helps us in those cases. They help us to manage the stateful applications. That is the statefulSet provide guarantee about ordering and uniqueness of the pod deployment as defined in the podspec. They maintain this guarantee in create, update, delete operations.
We can define the StatefulSet like below:
apiVersion: apps/v1
kind: StatefulSet
metadata:
  name: web
spec:
  selector:
    matchLabels:
      app: nginx # has to match .spec.template.metadata.labels
  serviceName: 'nginx'
  replicas: 3 # by default is 1
  template:
    metadata:
      labels:
        app: nginx # has to match .spec.selector.matchLabels
    spec:
      terminationGracePeriodSeconds: 10
      containers:
        - name: nginx
          image: k8s.gcr.io/nginx-slim:0.8
          ports:
            - containerPort: 80
              name: web
          volumeMounts:
            - name: www
              mountPath: /usr/share/nginx/html
  volumeClaimTemplates:
    - metadata:
        name: www
      spec:
        accessModes: ['ReadWriteOnce']
        storageClassName: 'my-storage-class'
        resources:
          requests:
            storage: 1Gi
We created a StatefulSet with a name web. In the spec we define create 3 replicas of nginx container. We also mount the volume from www to /usr/share/nginx/html inside the pod. We have also defined the volumeClaimTemplates. It will provide stable persistent volume storage of size 1 GigaByte. Internally the Kubernetes cluser uses the PersistentVolume container.
DaemonSet
Sometimes you need to run a pod on all (or some) nodes in your Kubernetes cluster. For example, if you are collecting metrics from every node, then we will need to schedule some pods on every node that collects the metrics. We will use DaemonSet for those nodes.
Services
The deployments define the actual state of the application running on the containers. Users will need to access the application or you might need to connect to the container to debug it. Services will help you. The services are the Kubernetes object that provides access to the containers from the external world or between themselves.
We can define the service like below:
apiVersion: v1
kind: Service
metadata:
  name: my-service
spec:
  selector:
    app: MyApp
  ports:
    - protocol: TCP
      port: 80
      targetPort: 9376
The above service maps incoming connections on port 80 to the targetPort 9376 running inside the container.
You can consider the services as the load balancer, proxy or traffic router in the world of Kubernetes.
Networking
This is the most important element of Kubernetes. The pods running should be exposed to the network. The containers that are running inside the pods should communicate between themselves and also to the external world. While service provides a way an abstraction to connect with the pods, networking determines how to expose these services.
In Kubernetes we can expose the service through the following ways:
- Load Balancer
- The Load Balancer provides an external IP through which we can access the pods running inside through the service abstraction.
- The Kubernetes will start the services first and then
asynchronouslystarts a load-balancer. After the loadbalancer is started, We can access the services via the loadbalancer IP.

- Node Port
- All the services will have a dynamically assigned port.
- We can access the services using the Kubernetes master IP on the port which the services are exposed.

- Ingress
- Each of the services will have a separate address.
- These services are then accessed by an ingress controller.
- The ingress controller provides public IP or external IP and all the services can only be accessed through this IP. The Ingress controllers are not started with the Kubernetes. They provide a separate external IP and the IP is not related to Kubernetes.

Secrets
Often for the applications, we need to provide passwords, tokens, etc., Kubernetes provides secrets object to store and manage the sensitive information. We can create a secret like below:
apiVersion: v1
kind: Secret
metadata:
  name: mysecret
type: Opaque
stringData:
  config.yaml: |-
    apiUrl: "https://my.api.com/api/v1"
    username: {{username}}
    password: {{password}}
Best practices
While Kubernetes is an ocean and whatever we have seen is just a drop in it. Since Kubernetes supports a wide range of applications and options, there are various different options and features available.
Few best practices to follow while working with Kubernetes are:
Make smaller YAML
The yaml files are the heart of Kubernetes configuration. Whether you hate it or love it, it is by far the most basic method to talk with Kubernetes. We can define multiple Kubernetes configurations in a single yaml. While yaml reduces the boilerplate when compared with JSON. But still yaml files are space-sensitive and error-prone. So always try to minimize the size of yaml files.
For every service, deployment, secrets, and other Kubernetes objects define them in a separate yaml file.
Split your yaml files into smaller files.
The single responsibility principle applies here.
Smaller and Fast boot time for images
Kubernetes automatically restarts the pods when there is a crash or upgrade or increased usage. It is important to have a faster boot time for the images. In order to have a faster boot time, we need to have smaller images.
Alpine images are your friends. Use the Alpine images as the base and then add in components or libraries to the images only when they are absolutely necessary.
Always remember to have smaller image sizes. Use
builder patternto create the images from Alpine images.
Healthy - Zombie Process
Docker containers will terminate only when all the processes running inside the container are terminated. The Docker containers will return healthy status even when one of the processes is killed. This creates a Healthy-Zombie container. Try to have a single process inside the container. If running a single process is not possible then try to have a mechanism to figure out whether all the required processes are running.
Clean up unused resources
In the container world, it is quite common to have unused resources occupying the memory. It is important to ensure the resources are properly cleaned.
using Docker often have you tried
docker system prune --all. See how much space you can save.
Think about Requests & Limits
Ensure that requests and limits are properly specified for all the containers.
resources:
  requests:
    memory: '100Mi'
    cpu: '100m'
  limits:
    memory: '200Mi'
    cpu: '500m'
The requests are the limits that the container is guaranteed to get. The limits are is the maximum or minimum resource a container is allowed to use.
Each container in the pod can request and limit their resources.
RED / USE pattern
Monitor and manage your services using RED pattern.
- Requests
- Errors
- Duration
Track the requests, errors in the response and the duration to receive the response. Based on this information, tweak your service to receive optimum performance.
For the resources, use the USE pattern.
- Utilization
- Saturation
- Errors
Monitor the resource utilization and how much the resources are saturated and what are the errors. Based on this information, tweak your resources to optimize resource allocation.
Hopefully, this might have given you a brief overview of Kubernetes. Head over kubernetes.io for more information on Kubernetes.
Now you want experience Kubernetes along with Istio this post.
Wait, what is Istio? Refer here to know more about Istio.